Your Site for Comprehensive Bowhunting Information
|
|
Bow Setup If you purchase a new bow from an archery shop the seller will most likely set it up to your needs. However, if you purchase the bow at a discount store like Wall-Mart or on line you are on your own. You will have to set up the bow yourself. Generally bows are sold without sights, arrow rest, or stabilizer unless you purchase a package that is ready to shoot. Of course the down side of a package is that you have no choice of these accessories. If you purchase a used bow a bow shop will set it up for you. This is probably a good idea if you are new to archery. Besides, some operations such as installing a peep sight or changing the draw length may require taking the tension off from the bow string with a bow press. That said, there are a number of things anyone with a little mechanical ability can do to get your bow ready to shoot.
Do not loosen the hex bolt more than four complete turns or the threads may strip, collapsing the bow and possibly causing injury. The draw weight can be measured with a spring scale that has a max-weight slider. Hang the scale from a strong support (a large nail or lag screw), hook the center of the bow string to the scale and pull down with both hands. At full draw the scale pointer will bounce up, but the slider will remain at the draw weight. After installing an arrow rest you have to adjust it so that it is in the center of the bow. Newer bows often have lines or groves in the riser to show where the center of the bow is. If your bow does not, the threaded hole that mounts the arrow rest is a good approximation of the center, and the arrow rest should hold the arrow centered on this hole. If your bow has a horizontal center line on the flat under the arrow rest hole marking the plane in which the string travels, be sure to adjust the arrow holder horizontally to center the nocked arrow over this line. If there is none, adjust the arrow holder so that a nocked arrow lies parallel to the flat of the riser. |
 |
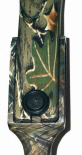
If your arrow rest is of the two tine variety you will have to adjust the the spacing between the tines to fit the arrows you will be using. Be sure the tines and/or the nocks on your arrows are adjusted so that the fletching will clear the tines. In a hunting situation this type of arrow rest can be troublesome because the arrow can fall off the tines. A favorite arrow rest with bow hunters is the Whisker Biscuit shown on the left. It is a brush that encircles the arrow so it can't fall off the rest. If you purchase one be sure to determine which type of arrow you will be using so that you get the right hole size. One annoying property of the |
| Whisker Biscuit is that it causes plastic fletching to
become wavy and sometimes pull away from the arrow. The waviness is easily fixed by heating the vanes with a hair dryer
which causes them to shrink back straight again.
Vane cement will glue the vane down. Put a little extra at the front
end of the vane to help prevent recurrence of the lifting. You need to set your knocking point. Lay your bow on a flat surface. Nock an arrow, and using a small square for reference slide the nock to where the arrow is perpendicular to the string. Be sure that the arrow is properly set in the arrow rest while you do this. You need to mark this spot for nocking your arrows. You can purchase beadlike string nocks (guides) that are squeezed on the bow string above the arrow's nock. When shooting your release is attached to the string below the arrow's nock. Alternatively you can purchase a string loop or a
If you have to install a peep sight, you may need to take the bow to a technician with a bow press. For lower draw weight bows you may be able to install the peep with the string under tension. Separate the bow string strands into two or three equal bundles depending on the type of peep. Insert the peep into the bow string. You should adjust your peep and front sight so that when the top pin is sighted in at 15 yards, it will end up near the center of your pin guard on the front sight. To do this, first move your peep to the spot where you can see through it when holding your draw at your anchor point. Then set your front sight's top pin slightly above the center of its adjustment range ( slightly above the center of the pin guard on your front sight). Nock an arrow, draw your bow and have someone measure the vertical distance from the shaft to the peep. Move your sight guard vertically so that the top pin is the same distance from the the shaft as the peep. Now you need to move the sight guard horizontally so that the top pin is in line with the bowstring when sighting down a nocked arrow. This should put you on target at about 10 yards. At this point you need to make sure the peep doesn't move by tying serving (a strong thread of the type used in bow strings) above and below the peep. Using about 6-8", tie a single know on the bow string having a long and short tail. Wind the long end tightly around the bow string about five times more or less in a heap, tie a couple half-hitches, then tie the two ends in a double knot. Slide your string ties as close to the peep as you can if it is the type that has the hole pointing to the riser. (See the pictures of installed peeps on the Bow Accessories page.) You are now ready to set your sights. Shoot an arrow at a target from about 10 yards. Move the whole sight down if it lands below, up if it lands above, to the right if the arrow lands to the right etc. In other words, move your sight in the direction that the arrow veers from the bulls eye. Try again and adjust until they shoot close to the bulls eye, then step back to 15 yards where as a beginner you should set your top pin. To fine tune your sights shoot four arrows before moving your sights. Repeat the above adjustments until a series of arrows shows no consistent deviation from your sighting point. Once you have set your top pin, make sure to tighten your vertical and horizontal adjustment screws so the sight will not move. Set the second pin at 20 yards by moving the pin, not the sight. Start with it about 1/8" lower than the top pin. Set the third pin at 25 yards. As a beginner you probably should not shoot at a deer any farther than that. As a general rule you should not shoot at a deer from any distance that you cannot consistently group your arrows within an 6" circle. The pin settings are only suggestions. As you improve you may want to set your sight pins differently or to eliminate one or two. Many bowhunters use only one pin in their sights to prevent any confusion when the critical moment comes. In the last 10 years or so several sighting systems have been developed that eliminate the need for a peep sight. These are not yet in general use, perhaps because hunters are not yet aware of them. They offer some advantages to the beginning archer in developing shooting skills. For a review of a peep eliminators see: http://www.fastestbows.com/reviews/peep_eliminator_compound_bow_sight.htm
|
